
• how to turn properly when driving

How to Turn Properly When Driving: Professional California Driving Techniques

How to turn properly when driving is much more than learning how to rotate a steering wheel. Every smooth turn is built from dozens of small decisions that happen before the front wheels even begin to change direction. Your speed, lane position, vision, steering technique, timing, and understanding of how a vehicle naturally moves through a corner all work together. When one of those pieces is missing, the turn usually feels rushed, awkward, or unpredictable. After teaching hundreds of behind-the-wheel lessons, I’ve found that most students don’t struggle because turning is difficult. They struggle because nobody has ever explained the complete process. Many guides show you where to place your hands or when to signal, but very few explain why experienced drivers make every turn look smooth and effortless.

What Years of Teaching Taught Me About Turning

I’ve been driving for more than 23 years, riding motorcycles for over 11 years, and working as a California-licensed driving instructor. During that time, I’ve worked with drivers of every experience level—from teenagers getting behind the wheel for the first time to adults who had driven for years but still didn’t feel comfortable making turns. One lesson has stayed with me throughout those years: confidence isn’t built by memorizing instructions. It develops when you understand what the vehicle is doing and repeat the correct movements until they feel natural. This guide isn’t based on theory or handbook summaries. Everything you’ll read comes from real behind-the-wheel lessons with students learning to turn safely in everyday traffic. Some of these techniques were developed and refined while teaching new drivers on California roads. Others come from lessons every motorcyclist learns early about vision, balance, and vehicle control—principles that apply just as well behind the wheel of a car. My goal isn’t simply to explain how to make a turn. I want to share the practical methods I use during actual driving lessons: preparing the vehicle before any steering input, avoiding habits that commonly create problems for beginners, and understanding what the car is doing throughout the maneuver. These habits can make turns smoother, safer, and more predictable long after the driving test is over.
Turning Begins Before the Steering Wheel Moves

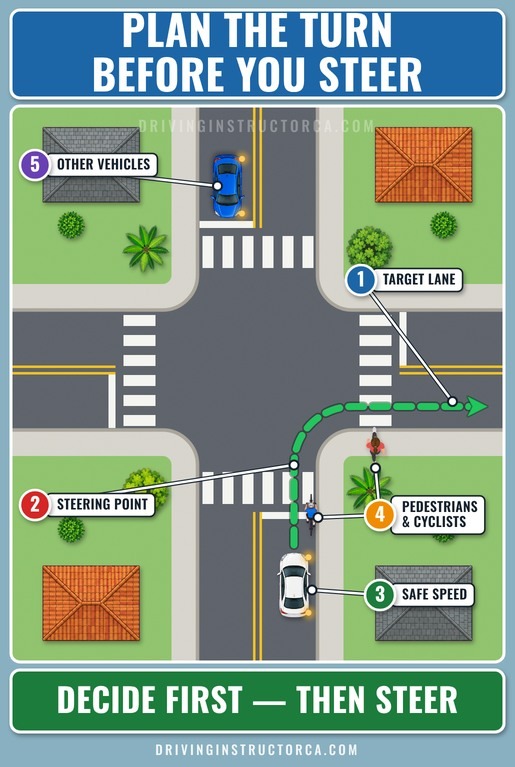
One of the first things I tell every new student is this: Most of the work behind a good turn happens before your hands begin rotating the wheel. That often surprises beginners. Steering seems like the obvious challenge, yet moving the wheel is usually the simple part. The quality of the turn depends much more on what the driver has already done before that movement begins.

As an experienced driver approaches an intersection, several questions have usually been answered already:

  • Which lane will I enter after the turn?
  • Where should I begin steering?
  • Is my current speed appropriate?
  • Could pedestrians, cyclists, or parked vehicles affect my path?
  • Is another vehicle likely to move into the same space?

The hands should begin steering only after those decisions are made.

how to turn properly when driving: plan the turn before you steer

Beginners commonly reverse that order. They reach the intersection and then try to solve everything while the car is already changing direction. The result can be delayed steering, unnecessary braking, wandering within the lane, and repeated corrections before the vehicle straightens. Often, only a few seconds of preparation separate a controlled turn from an awkward one. Before reaching the intersection, an experienced driver has already pictured the path, judged the amount of steering required, and identified possible hazards. Once the car reaches the limit line, the hands are carrying out a decision that has already been made.

Before Steering, Train Your Hands

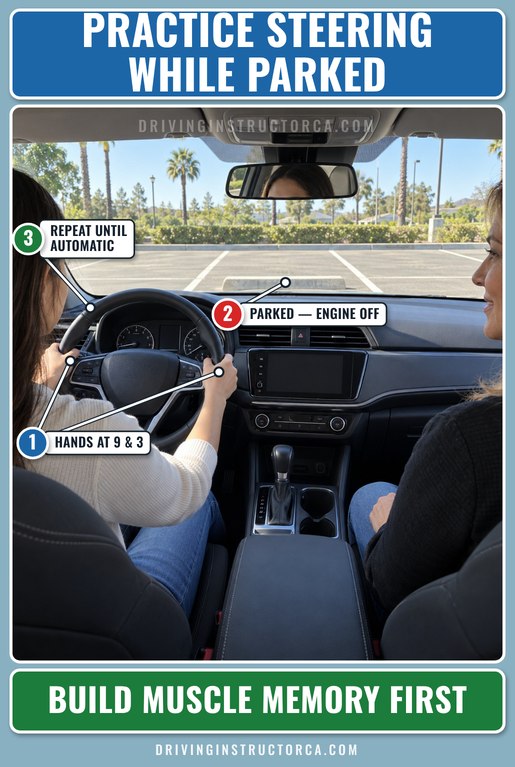
One exercise I recommend to every new student surprises them because the car never even moves. Sit in your parked vehicle with the engine off and simply practice steering. No pedals, no mirrors, no traffic, no pressure. Repeat the movements until your hands no longer need your full attention.

practicing steering while parked with hands at 9 and 3

During the first driving lessons, beginners are often asking their brains to handle too much at once. At a single intersection they may be trying to:

  • watch traffic,
  • judge speed,
  • operate the pedals,
  • remember which hand moves first,
  • avoid the curb,
  • and stay in the correct lane.

For someone who is still learning, that is a lot to process simultaneously.

Taking traffic out of the exercise leaves the brain with one job: learning the steering movement. This is how muscle memory begins to develop. Repeated physical movements gradually require less conscious thought. Once steering no longer consumes so much attention, the driver has more mental capacity for traffic, pedestrians, lane position, and other conditions outside the car. I often see students improve dramatically after spending just fifteen or twenty minutes practicing steering while parked.

Understanding Steering Techniques

Many driving schools introduce every steering method during the first lesson. Personally, I think that’s one of the biggest reasons beginners become confused. Instead, I teach steering as a progression. Learn one movement first, then add another. As confidence develops, the separate movements begin working together and eventually feel like a single natural steering action.

Hand-to-Hand Steering

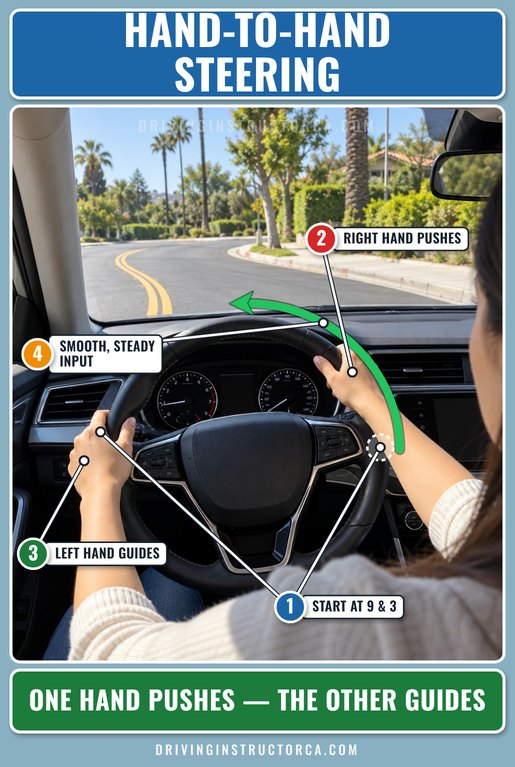
I usually begin with hand-to-hand steering because it teaches a student to control the wheel smoothly before we move on to larger steering inputs. When students are just beginning, I recommend placing their hands at approximately the 9 and 3 o’clock positions—the starting position the California Driver Handbook recommends for hand-to-hand steering, with 8 and 4 o’clock as the alternative. More experienced drivers may later settle into a slightly different hand position, but starting at 9 and 3 gives beginners a clear reference for understanding the job of each hand. When the turn begins, the hand opposite the direction of the turn provides the push. On a left turn, for example, the right hand moves the wheel upward and across toward the left. The other hand doesn’t actively pull. It stays lightly in contact with the rim, letting the wheel travel through the palm while still providing guidance and stability. In other words, one hand creates the movement while the other allows that movement to continue smoothly.

how to turn properly when driving with hand-to-hand steering

I find this especially useful for:

  • gentle curves,
  • lane changes,
  • normal right and left turns,
  • and everyday situations that need only moderate steering input.

Practice until you no longer need to consciously plan where each hand goes. Once that part becomes automatic, your attention can stay where it belongs—on traffic, pedestrians, your position in the lane, and the road ahead.

Instructor Tip: While you’re learning, don’t simply allow the wheel to slide back through your hands at the end of a turn. Use the opposite hand to bring it toward center under your control. Doing this lets you feel the connection between the amount of wheel movement, the changing angle of the front tires, and the way the car straightens. With repetition, that relationship becomes intuitive and your steering becomes more consistent.

Hand-Over-Hand Steering

Hand-over-hand steering becomes useful when the amount of wheel rotation needed is greater than you can comfortably achieve with the basic hand-to-hand movement. It starts in much the same way: one hand creates the steering input while the other remains lightly in contact with the wheel and lets it travel through the palm. The transition happens as the pushing hand approaches the other hand. Rather than interrupting the rotation, slightly release the supporting hand so the pushing hand can travel underneath it. After it passes, the supporting hand takes hold and continues rotating the wheel while the first hand moves back to its starting area—approximately the 3 o’clock position. If the turn needs still more steering, you can repeat the sequence without breaking the flow. Hand-over-hand steering is especially useful for:

  • sharp left and right turns,
  • U-turns,
  • parking maneuvers,
  • and situations requiring a larger steering angle.

Prepare Your Hands Before a Sharp Turn

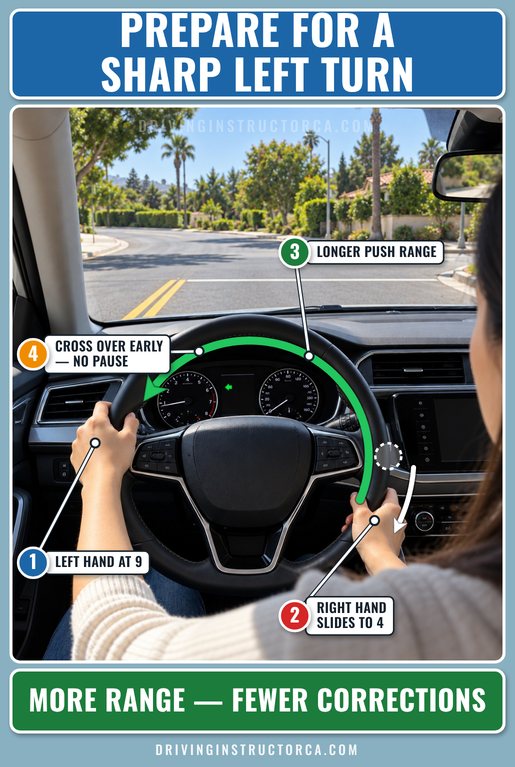
hand position for a sharp left turn with the right hand at 4 o’clock

Most instructors simply demonstrate the movement. I prefer explaining how to prepare for it, because one small adjustment before the turn makes the technique much easier to perform. Imagine your hands begin around the 9 and 3 o’clock positions and you’re approaching a sharp left turn. Instead of beginning immediately from that position, slide your right hand down to approximately the 4 o’clock position before you start steering. Now the hand doing the push has considerably more room to travel before meeting the supporting hand. That extra range lets you produce more wheel rotation in the first movement and can reduce how often you need to reposition your hands during the turn.

Students usually feel the difference right away. Sharp turns often require fewer corrections and less arm crossing because the hands have more usable range before the next transition. One more tip makes this technique even smoother. Don’t wait until the pushing hand has nowhere left to go before beginning the crossover. Make the transition soon enough that wheel rotation never pauses. A hesitation in the middle of the turn often interrupts the car’s arc and forces the driver to correct the steering afterward. It sounds like a minor adjustment, but students usually notice the result quickly. With a little practice, sharper turns begin to feel calmer, more controlled, and less complicated.

Combining the Techniques Naturally

Here’s something I rarely see explained in driving manuals. When I first start working with new students, I don’t try to teach every steering movement at once. During the first lessons, I ask them to concentrate only on the pushing movement. After that action feels natural and the student no longer has to decide which hand should move first, I begin adding the role of the opposite hand. Imagine you’re making a very tight left turn. After one hand-over-hand movement, the pushing hand has to travel back toward its starting point so it can be ready again. Rather than pausing the wheel during that reset, I teach the student to use the other hand for a gentle pull. While that hand keeps the wheel moving, the pushing hand returns to its original position and prepares for another input if the turn requires it. The result is continuous rotation rather than a stop-and-start sequence. I don’t teach this combination immediately because beginners can easily become overloaded. I first want the pushing action to feel completely familiar. Once it does, adding the pulling action is much easier and produces noticeably smoother steering during tight turns, parking maneuvers, and U-turns. At that point, students usually stop thinking about each hand as a separate step. The two hands begin working together to produce one controlled movement.

Don’t Let the Steering Wheel Teach You

Many beginners are told: “Just let the steering wheel spin back by itself.” A steering wheel can naturally move back toward center because of the vehicle’s steering geometry, but I don’t think relying on that behavior is the best way for a beginner to understand steering. During the learning stage, I prefer having students return the wheel themselves. Pay attention to how far it moves. Notice how quickly the front tires straighten. Feel how each movement of your hands changes the direction of the vehicle. Manually controlling that return helps build a direct connection in your mind between what happens at the steering wheel and what happens at the tires. With experience, allowing some natural self-centering can become part of normal driving. But while you’re learning, actively controlling the wheel gives you a much clearer understanding of its response. One principle I repeat constantly during lessons is simple: Your hands should control the steering wheel—not react to wherever the wheel happens to move.

The Turning Trajectory: The Secret Most Beginners Never Learn

If I had to identify the single reason new drivers make poor turns, I wouldn’t start with the way they hold the wheel. I’d look at where the turn actually begins. A common beginner instinct is to start rotating the wheel the moment the front of the car reaches the limit line. In many situations, that is simply too early. Begin too soon and the car cuts the corner. Instead of tracing a natural curve, it takes a shortcut that may carry part of the vehicle across the center line, into opposing traffic space, or uncomfortably close to the inside curb. Wait too long and you create the reverse problem. The arc becomes unnecessarily wide, often requiring extra corrections and allowing the car to wander toward another lane before it straightens. What you’re looking for is neither an early nor a late steering point. You want one continuous, smooth arc that carries the vehicle from its original lane into the new one. One phrase I often tell my students is: A beautiful turn isn’t made with the steering wheel. It’s made with the trajectory. Your hands are simply guiding the car along a path you should already be able to visualize.

The Correct Left Turn Trajectory

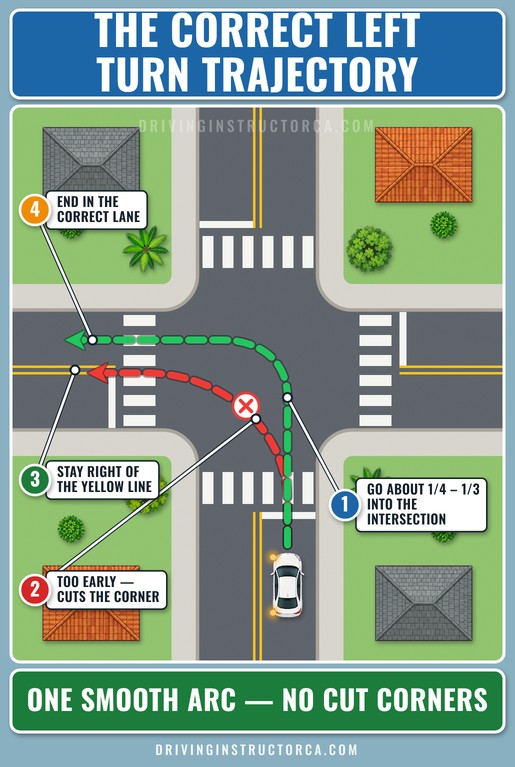
Left turns tend to be more difficult for beginners because the car must travel farther through the intersection before it settles into the new roadway. A mistake I see frequently is beginning the steering input almost as soon as the car passes the limit line. When that happens, the car cuts across the inner portion of the intersection rather than following a clean curve. A better approach is to continue forward farther before asking the vehicle to change direction. At a typical residential intersection, that may mean traveling roughly one-quarter to one-third of the way into the intersection before beginning to rotate the wheel. The word roughly matters. There is no universal distance.

how to turn properly when driving: correct left turn trajectory

Roads and intersections vary considerably. A narrow neighborhood intersection and a broad multi-lane intersection obviously require different trajectories. The vehicle matters too: wheelbase, overall length, and available steering angle all influence the path it will naturally follow. So don’t memorize the fraction. Understand what you’re trying to achieve. Move the front of the car far enough forward that the rest of the vehicle can sweep cleanly into the correct lane without cutting across the corner or crossing the yellow center line. One visualization works well for many of my students. Picture a broad, smooth arc connecting the middle of your current lane with the middle of the lane you’re entering. Begin steering too soon and you cut across that imaginary curve. Wait too long and the curve becomes an oversized loop. The useful path lies between those two extremes.

A Simple Reference Point

Students often ask: “How do I know when it’s time to begin turning?” I teach them to stop looking for an exact distance. Instead, pay attention to the relationship between the vehicle and the corner. As the front of the car approaches the place where you expect to begin steering, think about the path the inside rear wheel will take. If that rear tire would ride over the curb or carry the vehicle across the yellow line, the steering input is beginning too soon. If you’ve already gone beyond the corner and now need a strong correction to bring the car back into the intended path, you waited too long. It takes repetition for your eyes to learn this relationship, but eventually you stop calculating it. With experience, the correct point begins to look natural before your hands make the first steering movement.

The Correct Right Turn Trajectory

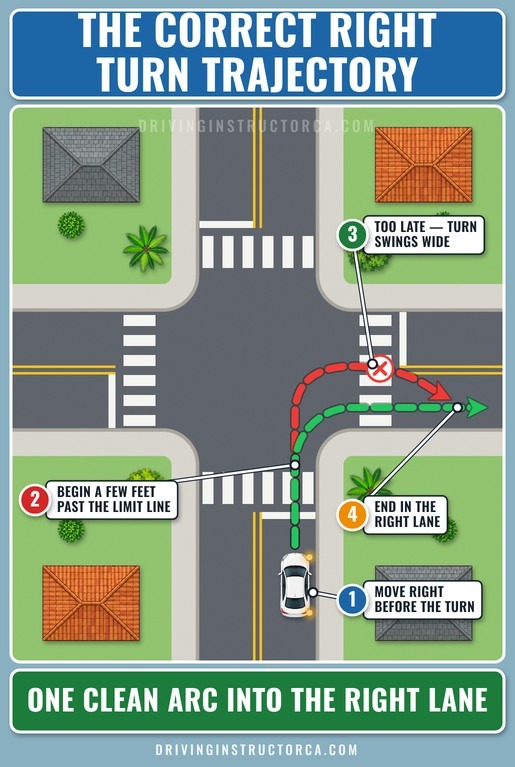
how to turn properly when driving: correct right turn trajectory

Right turns give you less room to work with before the vehicle reaches the curb. Here, beginners often make the opposite error: they continue too far forward before they start steering. The result is a turn that opens too wide and can carry the car unnecessarily close to the neighboring lane. At many residential intersections, you may need only a few feet beyond the limit line before beginning the steering movement. That isn’t a fixed measurement. The correct point changes with:

  • the width of the intersection,
  • the shape of the curb,
  • the size of your vehicle,
  • and parked vehicles immediately beyond the corner.

For example, when parked cars sit close to the corner of the street you’re entering, delaying the right-turn steering slightly can create a better approach angle and more clearance. Again, don’t memorize a number. Understand what you’re trying to produce. The car should trace one clean arc into its lane without contacting the curb or allowing the turn to carry it into the neighboring lane.

Lane Position Before a Right Turn

Another habit I strongly encourage is preparing your lane position before reaching the intersection. Many beginners remain near the middle of the lane until the last moment, then steer toward the right edge at the same time they’re trying to begin the turn. Now they’re performing two steering tasks at once. I teach students to set up for the turn much like they would prepare for a lane change. First:

  • activate your turn signal (the California Driver Handbook says to start signaling about 100 feet before the turn),
  • check your mirrors,
  • perform an over-the-shoulder blind-spot check,

and only then gently move closer to the right side of your lane. If there is a bike lane next to you, California law requires you to merge into it before the turn, no more than 200 feet before the intersection—after you have checked carefully for cyclists. Once you’re positioned there, bring the vehicle and the steering wheel straight again. That last step matters. You don’t want to keep angling toward the curb all the way to the limit line. Complete the positioning adjustment early enough that the car is moving straight before you begin the actual turn. Starting from that stable position makes the turn itself much easier. Of course, the road has to give you enough room to do this. If parked vehicles leave no reasonable space to move right and straighten before the intersection, don’t squeeze into a gap just to follow the technique. Trying to force the car ahead of a parked vehicle near the corner can create a worse approach than simply staying straight and making a normal turn from the space available. Professional driving isn’t about applying one instruction mechanically in every situation. It’s about understanding the principle and adapting it to the road in front of you.

When Should You Start Returning the Steering Wheel?

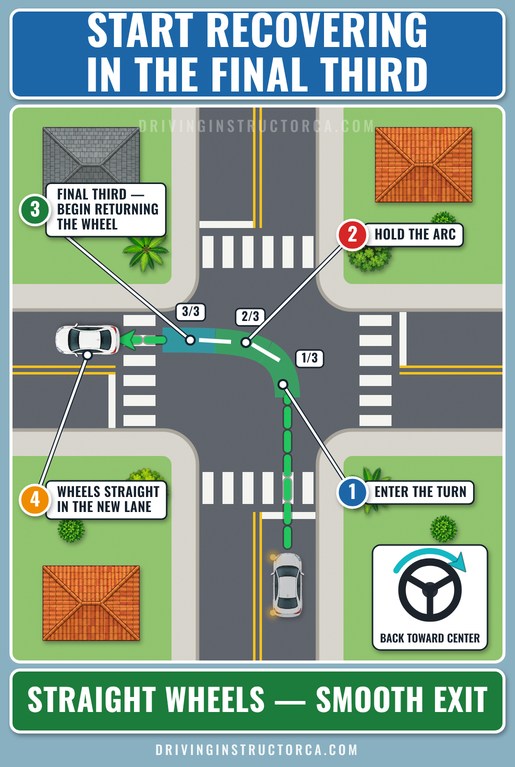
This is probably the most misunderstood part of turning. Ask ten beginner drivers when they should begin turning the steering wheel back toward center, and most will answer: “After I finish the turn.” That sounds logical. Unfortunately, it’s also why many beginners drift across their lane immediately after turning. Think about what happens. The vehicle has already entered the new road. The wheels are still pointed left or right. The car keeps turning because the front tires are still steering. Only then does the driver suddenly realize they’re approaching the opposite lane, a parked car, or the curb. The driver usually reacts by bringing the steering wheel back too quickly, causing the vehicle to jerk into the lane instead of flowing smoothly out of the turn.

Experienced drivers don’t wait until the turn is finished. They begin recovering the steering wheel during the turn. A useful way to visualize this is to imagine the turn divided into thirds. As the vehicle enters the final third of the turning arc, your hands should already begin guiding the steering wheel back toward center. Not suddenly. Not all at once. The movement should be continuous. Smooth. Almost invisible.

returning the steering wheel in the final third of a turn

Start gently. As the vehicle straightens, increase the speed of the recovery if necessary, until the front wheels become parallel with the roadway. By the time the car is completely inside its new lane, the steering wheel should already be close to its normal driving position. When students learn this timing, one interesting thing happens. Their turns immediately become smoother. The car stops “snapping” straight at the end of the maneuver. Instead, it simply flows from the curve into the lane. That’s exactly how experienced drivers make turning look effortless.

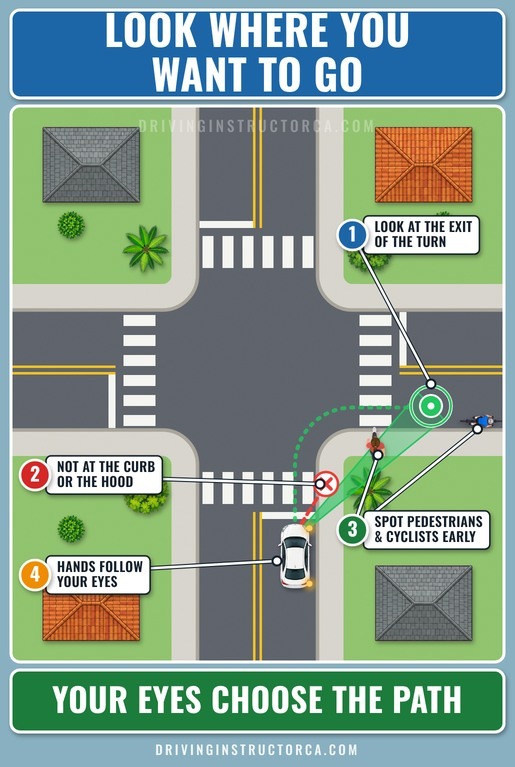
Look Where You Want the Car to Go

look where you want to go during a turn

If I could teach every new driver only one habit, it would probably be this one. Your hands naturally follow your eyes. Most beginners don’t realize they’re looking at the wrong thing. They’re watching:

  • the curb,
  • the yellow line,
  • the parked car they’re afraid of hitting,
  • or the front edge of the hood.

Ironically, that’s often why they steer toward those very objects.

There’s a well-known concept in motorcycle riding called target fixation. Riders quickly learn that a motorcycle can begin drifting toward whatever receives too much of the rider’s attention. That’s why riders are trained to look through a corner toward the path they want to follow rather than staring at the obstacle they want to avoid. A car is more forgiving in this respect, but the visual principle still matters. Your eyes continuously feed information into the small steering adjustments you make. Look only a few feet beyond the hood and those adjustments tend to come late, after the vehicle has already started moving away from the intended path. Instead, train yourself to look toward the point where you want the turn to end. As you begin the maneuver, your eyes should already be scanning the lane you’ll enter—not the pavement directly in front of your hood. This simple habit changes several things at once:

  • your steering becomes smoother,
  • you make fewer sudden corrections,
  • it’s easier to stay centered in your lane,
  • and you notice pedestrians, cyclists, and vehicles much earlier.

During lessons, I often notice that the moment a student starts looking toward the exit of the turn instead of the curb, their steering immediately becomes smoother—even before we discuss the steering wheel itself. One phrase I often use with students is: Your eyes choose the path. Your hands simply follow it.

A Mental Exercise That Changes Everything

Before every turn, ask yourself one simple question: “Where do I want the center of my car to be a few seconds from now?” Not where the front bumper is. Not where the steering wheel is. The center of the vehicle. That one question shifts your attention away from reacting to what’s directly in front of you and toward planning the vehicle’s complete path. Experienced drivers do this subconsciously. Beginners can learn to do it consciously until it becomes automatic.

Relax Your Hands—The Steering Wheel Isn’t a Battle

Another pattern I notice almost every week is how tightly beginners grip the steering wheel. It’s completely understandable. Driving is new. Traffic feels unpredictable. The natural reaction is to squeeze harder. Unfortunately, that usually has the opposite effect. When your hands become tense, your shoulders tense up too. Your arms lose flexibility, and steering starts to happen in short, jerky movements instead of one continuous motion. Think about writing your signature. If you grip the pen as hard as possible, your handwriting immediately becomes stiff. Steering works the same way. You don’t want a loose grip, but you also don’t want to fight the steering wheel. Hold it firmly enough to stay in control while allowing your arms and shoulders to move naturally. Students are often surprised by how much smoother their turns become after doing nothing more than relaxing their grip.

Build One Continuous Steering Movement

One difference between experienced drivers and beginners is the number of steering corrections. A beginner often turns like this: turn… pause… turn more… correct… straighten… correct again. An experienced driver usually performs one continuous movement. The steering wheel rotates smoothly into the turn, reaches its maximum angle naturally, and then begins returning toward center in one uninterrupted motion. Try to think of your steering wheel as drawing a single flowing curve instead of several separate movements. When students focus on making one continuous steering input rather than a series of corrections, the entire vehicle feels calmer and more stable.

Instructor’s Tip

One exercise I frequently use during driving lessons is much simpler than most students expect. Instead of asking a beginner to concentrate on everything at once, I isolate one skill at a time. During the first few lessons, I often take responsibility for controlling the vehicle’s speed with the instructor pedals whenever it’s appropriate and safe to do so. That allows the student to focus entirely on steering, vision, and understanding the vehicle’s trajectory without feeling overwhelmed. Once the steering movements become smooth and consistent, I gradually ask the student to take over speed control as well. The next step is learning to combine steering, speed control, observation, and lane positioning into one continuous maneuver. Trying to master every part of a turn at the same time usually slows progress. Building one skill first, then adding the next, allows students to develop confidence without unnecessary stress.

Advanced Turning Situations Every Driver Should Master

Once you become comfortable making basic left and right turns, the next step is learning how to adapt your technique to different road conditions. Every intersection is slightly different, and experienced drivers make small adjustments without even thinking about them. The goal isn’t to memorize a different rule for every situation. It’s to understand the principles behind a good turn so you can apply them anywhere.

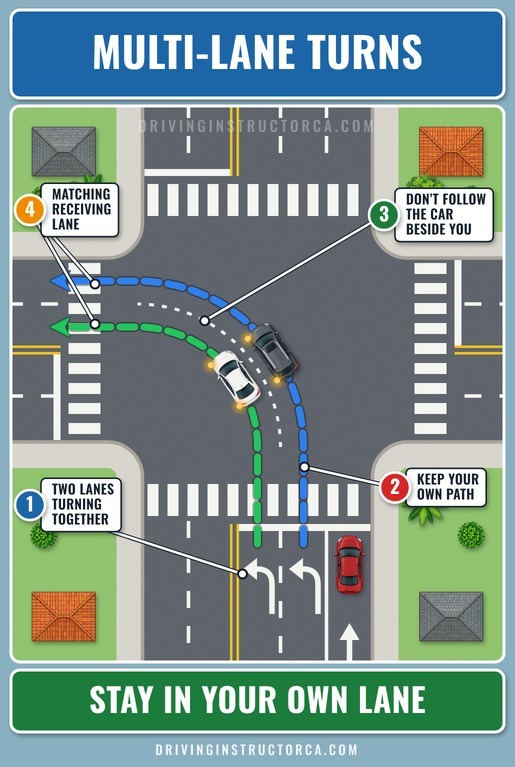
Multi-Lane Turns: Stay in Your Lane and Plan Your Path

Intersections where two or more turn lanes are turning in the same direction at the same time often make new drivers uncomfortable. Many students begin watching the vehicle beside them instead of concentrating on their own path, which can easily lead to drifting into the adjacent lane. As you approach the intersection, determine whether one lane or multiple lanes are permitted to turn in your direction. That single observation changes how you should plan the rest of the maneuver. If two or more lanes are turning in the same direction, each turning lane has its own path through the intersection and its own receiving lane. Your goal is to stay within your assigned lane from the moment you begin steering until the turn is complete. Avoid adjusting your trajectory to match another vehicle. If the driver beside you turns too wide or cuts the corner, you should continue following your own lane.

multi-lane left turn with each car staying in its own lane

When Only One Lane Is Turning

If only one dedicated turn lane is turning, the California Driver Handbook tells you to complete a left turn in the left lane and a right turn in the right lane, closest to the curb—unless signs or pavement markings show a different path. Before you begin, look ahead and study how traffic is organized on the opposite side of the intersection. Some intersections have protected turning lanes separated by solid white lane lines. For example, traffic approaching from the opposite direction may have a dedicated right-turn lane that enters the second lane from the left. In that situation, when you make a left turn, your correct path is into the leftmost receiving lane. Entering the second lane would require crossing the solid white line protecting the opposing right-turn traffic. This is one of the reasons I encourage students to plan the entire trajectory before they begin steering. Instead of looking only at the corner, look through the intersection and identify where your lane naturally ends. That habit helps you avoid last-second corrections and prevents you from entering a lane reserved for other traffic. For more on choosing and keeping the correct lane, see California Lane Rules Explained. One final point is just as important. Even when you’re following the correct lane markings, never assume another driver will do the same. Continue monitoring the vehicles around you throughout the turn. If another driver begins drifting into your lane, your priority is to avoid a collision, even if you were following the correct path.

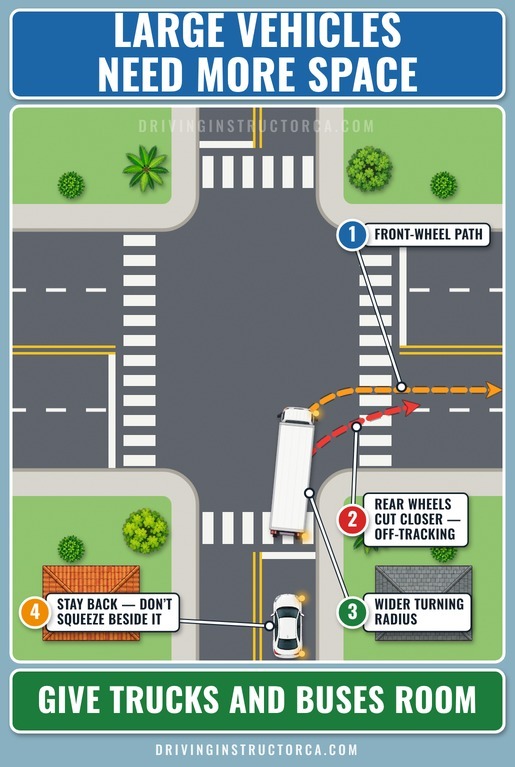
Large Vehicles Need More Space

off-tracking of a large truck during a right turn

One lesson beginners often discover unexpectedly is that not every vehicle turns the same way. A compact sedan, a pickup truck, and a full-size SUV all follow different paths through the same intersection. Longer vehicles have a larger turning radius. Their rear wheels follow a tighter path than the front wheels, a phenomenon known as off-tracking. Even if you’re currently driving a small car, understanding this concept helps you predict what larger vehicles are likely to do. If you’re turning beside a bus, delivery truck, or large pickup, avoid assuming it can stay perfectly within a tight turning path. Give it additional space whenever possible. Likewise, if you later drive a larger vehicle yourself, remember that your turning point will usually need to be slightly later than it was in a compact car.

Wet Roads Change More Than Stopping Distance

Many drivers associate rain with longer braking distances, but rain also changes how a vehicle behaves during a turn. Your tires have a limited amount of grip available. That grip is shared between:

  • braking,
  • accelerating,
  • and steering.

Brake before entering the turn whenever conditions allow. A vehicle that enters a corner smoothly at the correct speed is much easier to control than one still braking heavily halfway through the maneuver. On a wet road, the California Driver Handbook advises reducing your speed by 5 to 10 mph—and just as important, being smoother. Smooth steering, smooth braking, and smooth acceleration all help preserve traction.

Night Turns Require Earlier Planning

Driving at night reduces the amount of information available to your eyes. Objects appear later. Pedestrians may blend into the background. Lane markings can become harder to recognize, especially in older neighborhoods or during rain. Because your visual range is shorter, planning becomes even more important. Begin scanning the intersection earlier. Reduce speed a little sooner. Give yourself extra time to recognize pedestrians, cyclists, and parked vehicles before starting the turn. Many students think night driving requires faster reactions. In reality, it requires earlier decisions.

Practice Turning Rules in Real DMV-Style Questions

Smooth technique and California turning rules work together. The DMV written test checks whether you know where a turn must begin and end, which lane to use, and who must yield. Practice scenario-based questions on parking and turns to make those rules automatic.

Final Thoughts on How to Turn Properly When Driving

How to turn properly when driving isn’t about memorizing a sequence of steps. It’s about understanding how vision, planning, steering, and vehicle movement work together as one continuous process. Over the years, I’ve learned that the students who improve the fastest aren’t necessarily the ones with the quickest reactions. They’re the ones who slow the learning process down, practice each skill separately, and build good habits before adding more complexity. That’s exactly why I encourage beginners to practice steering with the car parked before combining it with traffic, to plan every turn before reaching the intersection, to look toward where they want the vehicle to finish—not where they’re afraid of going—and to guide the steering wheel smoothly instead of reacting at the last moment. Every confident driver you see on the road started as a beginner. The difference isn’t natural talent—it’s learning the right techniques, practicing them consistently, and understanding how the vehicle responds to every steering input. When those skills become automatic, turning no longer feels like a series of separate tasks. Vision, speed, steering, and vehicle position begin working together as one smooth movement. That’s the point where driving starts to feel natural—not because you’re reacting faster, but because you’re preparing earlier.

About the Author

Aram Minasyan is a California-licensed driving instructor with more than 23 years of driving experience and over 11 years of motorcycle riding experience. His teaching focuses on helping new drivers understand the reasoning behind every driving technique instead of simply memorizing rules. Drawing on hundreds of hours of behind-the-wheel instruction, Aram develops practical methods that simplify complex driving skills into clear, repeatable habits. His educational articles combine California traffic rules with real-world coaching techniques to help drivers build confidence that extends far beyond the driving test.